We still haven’t tried out contacts—in our future I expect. But I couldn’t help linking to this site even though I can’t vouch for it because it seems to have been started by a fellow parent who like me was devoted to finding the right lenses for his daughter with achromatopsia. But while I just managed a blog about it he/she managed a whole contact lens company! Awesome! https://achrolenses.com/
Author Archives: mgrubb
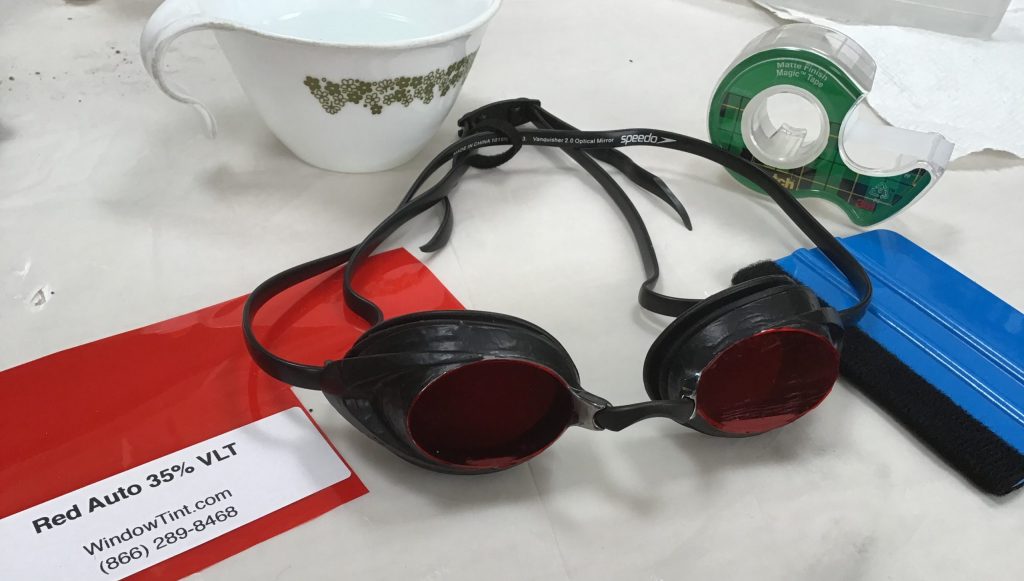
Easy Home-Tinted Prescription Speedo Swim Goggles for about $40 including cost of tools.
The Speedo Women’s Vanquisher 2.0 Mirrored Goggles were good for my daughter until they weren’t. In hindsight what is surprising is that she ever found them dark enough to be usable. But last summer I needed to find her something darker. Someone on the Achromatopsia Support Network suggested getting window tint material from a local auto shop and applying it to swim goggles. Great idea—and it worked! But I could have done it better. I got quite a dark tint material, but it was too light in a single layer and a bit too dark in a double layer.
This summer I decided to do better, and do it with prescription goggles too. I am pleased enough with the results to share the recipe:
Materials
-
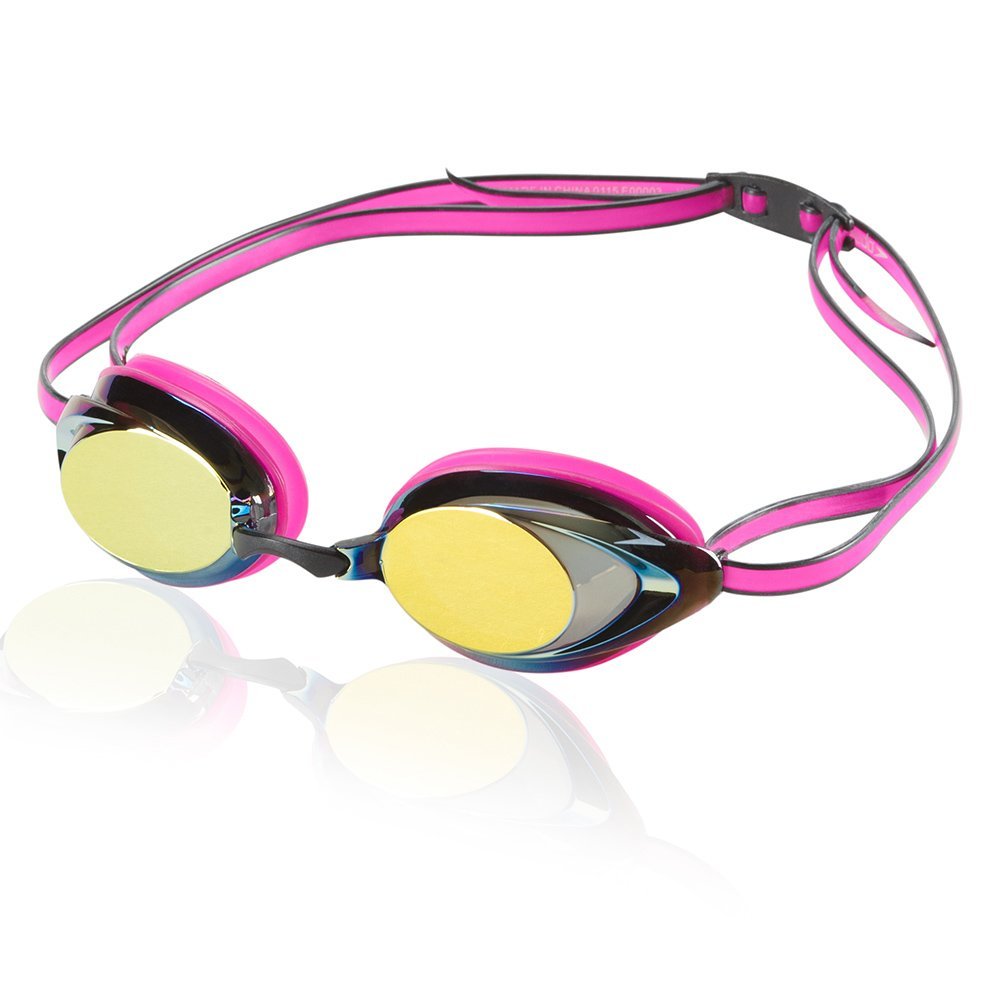
Speedo Vanquisher 2.0 Optical Mirrored swim goggles—color smoke and approximate prescription for nearsightedness. The prescription strength is listed as the “size”. $27.99 seems like a deal for prescription goggles! (Free shipping direct from Speedo with shoprunner via our credit card. I’ve heard Speedo gear on Amazon can be fake.) There is also a Junior size that we didn’t try because it was sold out in the prescription we needed. Also, you may want goggles without a prescription. In that case you could try a standard vanquisher goggle (or one in a junior or kids size), or really any swim goggle you like—such as one you already have. [Update: Another dad recommends Hilco Leader Junior swim goggles that allow you to choose the correct prescription for each eye—cheaper too!].
-
Black acrylic craft paint and fine paint brush with a stiff straight edge.
-
Red 35% VLT Auto Window Tinting Film FREE Sample from WindowTint.com (And any other tint samples you might want to try.)
-
Scotch tape.
-
Cup of water with a drop of dish soap
-
Squeegee tool (The one I link is okay but not great—it scratched when I pressed too hard so be gentle if you get a felt one like this. Perhaps one of these would have been better.)
Instructions
-
Peel the protective plastic films off each lens and SAVE.
-
Paint the sides to the swim goggles with black acrylic paint. Put it on thick or be ready for multiple coats. Let dry completely. Keep adding coats until you can’t see cracks of light on the sides when you hold them up to outdoor light.
-
Experiment with all the tint samples you ordered–holding them over your lenses. Try doubling up one sample, or mixing two different tints. Which are best for you? My daughter liked 2 layers of the red, but you might prefer another combination.
-
Use the protective plastic film as a template to cut out 4 ovals of tinting films (you will apply two layers on each lens) with the X-acto blade. They will be too big—this is fine—you will trim them to size after application.
-
Watch the tint application instructions and apply one layer of tint film to each lens:
-
Dip your finger in the cup of soapy water and wet a lens.
-
Place scotch tape on each side of the tint film oval, and peel apart to remove the backing. Using the tape on the tinted film as a handle to place on the lens—flush at the bridge of the nose but overhanging elsewhere. Remove the tape.
-
Add another drop of water with your finger tip and then squeegee the tint film in place. Dry excess water with soft cotton cloth (such as your t-shirt:) and press down hard for good adhesion.
-
Trim to fit with the X-acto knife, being careful not to ruin your paintwork.
-
Repeat on the other lens.
-
-
Repeat step 5 for a second layer of tint on each lens. Now you are done!
Tip: If you mess up tint application, just peel it off and try again (preferably with a new piece so it sticks well)!
Update: Other parents recommend a free sample of the dark red tint or reddish brown tint from decorativefilms.com. The reddish brown is a compromise that is light enough to see under water when diving.
Whiteboard App
This summer I’m leading a weekly math circle for my daughter and her friends at our house. I hit a conundrum. How could I do the equivalent of write on the board and let my daughter see what I’m writing? One-on-one its easy, she can get close. But with a big group she would be blocking everyone else’s view. Also, I don’t have a blackboard or whiteboard at home, and no video magnifier she could use to see it closer.
We hit up on a solution that is absolutely terrific! It does rely on a lot of expensive Apple products, so not for everyone, but I thought I’d share it here anyway. I’ve already shared it with my daughter’s TVI, and its sounds like she might have been thinking along these lines already for use in school.
Materials: Two ipads, an apple pencil, and an apple TV connected to a big screen TV.
Setup: Both ipads download the free Microsoft Whiteboard app. From my ipad, I create a new “whiteboard” in the app, and share a link to it to my daughter’s ipad. (You only have to do this once.) I mirror my ipad to the big screen TV via the apple TV. (Easy—just swipe down from the top right of the ipad screen to get the menu where you turn on mirroring.)
Usage: As the teacher, I write on my ipad with an apple pencil in the whiteboard app something that I would normally write on the board. Everyone can see it in real time. My daughter, who has the whiteboard app open on her ipad, sees it up close on her ipad. Moreover, the rest of the “class” (my daughter’s friends) can see what I’m writing on the big screen TV.
Neat Features: The Microsoft Whiteboard app has a few additional neat features I like. First, its free. Second, I can draw with a thick bold white pen on a black background which is much easier on the eyes because its not so bright. Third I can display a ruler on the screen and use it as a straight edge to draw straight lines, with the cool feature that the ruler is a built in protractor displaying the angle of the ruler. This is going to be cool for geometry.
Finally, three tips for using it smoothly, which would be relevant for implementing it in school:
1) When I pan left or right, or zoom in or out on my screen, my daughter’s screen does not follow along. She needs to manually do the same panning and zooming to follow me. Our solution was to make sure our screens were centered with the same zoom to start, and then I never changed the zoom or scrolled around. Perhaps with practice this summer my daughter will get good at panning to follow me, which would give the teacher more flexibility. However, it does mean that she can zoom in on a portion of the screen to see better without disrupting anyone else’s view, which is potentially a plus.
2) The main hiccup we had is that when my daughter swiped her finger on the screen to adjust the screen position/zoom, she didn’t realize she had the pen tool activated, so she was crossing out what I had written so nobody could read it. Luckily if this were to happen by mistake in class at school there is an easy fix. My daughter can hit the “undo” button repeatedly and it will quickly undo all of her edits without affecting anything the teacher wrote. Then she just has to press the check mark on the tool bar to close the editing tools. Then she can swipe to pan and zoom without accidentally writing or erasing. Not a problem.
3) Both of us had a bit of trouble with our ipads going to sleep in the middle of the math circle and needing to wake them up repeatedly – but I think we should be able to adjust the screen saver settings to solve that.
Swim goggles
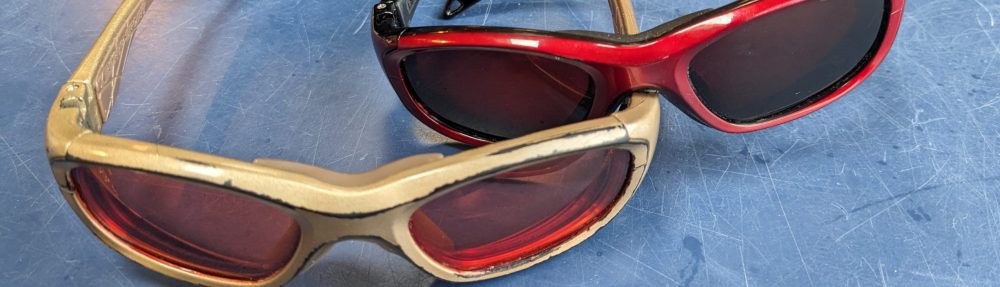
Summer is here, so its time for swim goggles. These ones work surprisingly well outdoors at the pool or the beach. Certainly better than the Leader goggles we had custom tinted. And they make my daughter happy at her indoor swim lessons as well. I don’t understand why they work so well, although they are definitely not perfect, but they’re cheap and easy from Amazon, so yay!
Speedo Women’s Vanquisher 2.0 Mirrored Goggles, Magenta.
Apparently the red is good too, but we haven’t tried.
Wine Cork Swing Cells

My father made my daughter a set of six wooden braille cells for use with used wine corks. Some are hinged swing cells, others just fixed braille cells. Having at least one swing cell is a great help for her learning to type braille on her Perkin’s brailler. They are about the right size to line up pretty well with the keys: 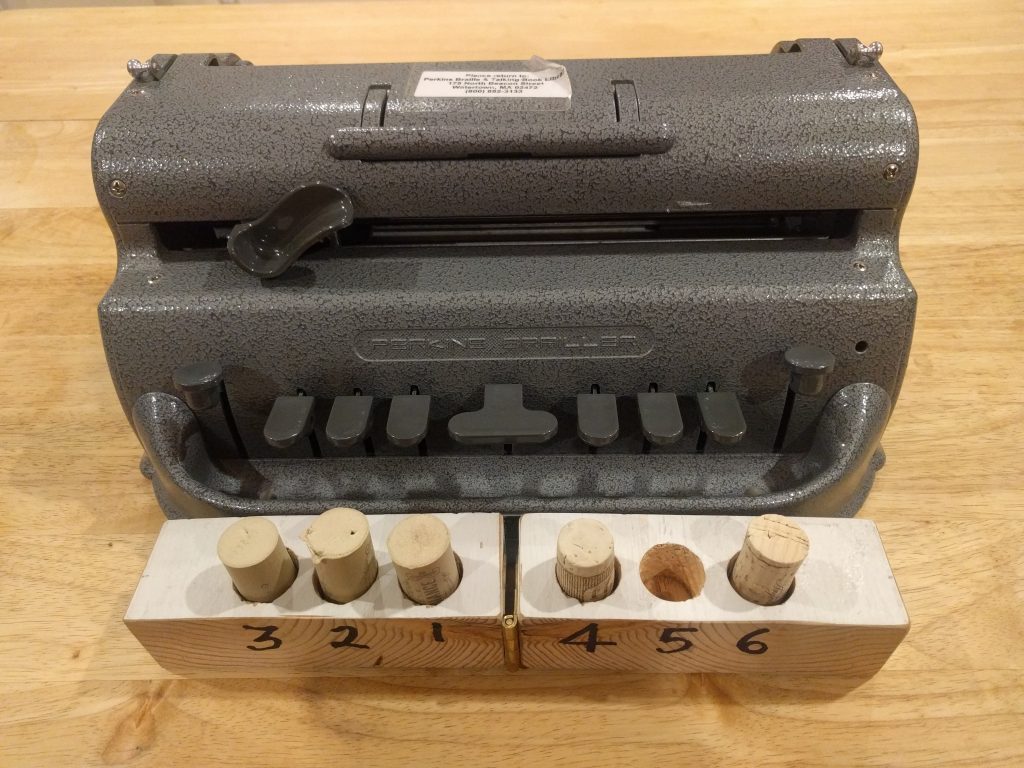
Having a bunch of braille cells like this, swing or fixed, has been great for learning to read braille. When my daughter is having trouble reading something, she can replicate with corks what she is feeling in the dots. Then we can talk about what she’s getting wrong with the dots, and once its straightened out, what the characters stand for. They are great for doing things like talking about the frustratingly subtle difference between “A” and “still” which she finds hard to distinguish. We also use them to drill contractions. (I place corks in the cell and ask her what it stands for, etc.)
They should not be too hard to make yourself. Basically get a block of wood about the right size, and drill 6 holes in it in a grid to fit wine corks. My father did a really nice job of getting the scale right so that, for instance, the space between dots within a cell is smaller than between dots in adjacent cells. This accuracy makes discussing the difference between “A” and “still” much easier. For instance we can talk about why this says “A still cat” rather than “still A cat”: 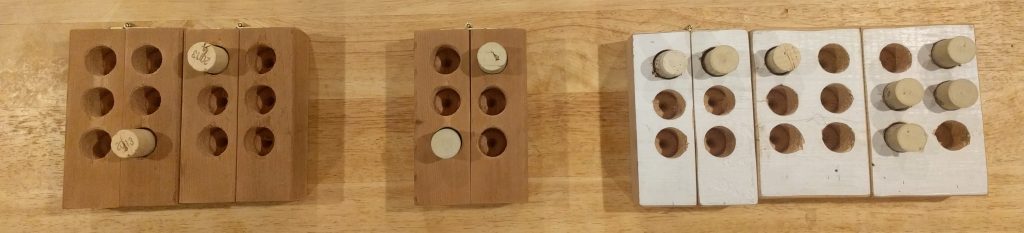
Braille Mat
My daughter used to have trouble with her braille reading material sliding around on her desk. I had a bit of unused rug underlay from Ikea, the sticky rubber matting to stop area rugs from slipping on wooden floors. I cut a square out for her desk and it helps a lot. After a while it gets dirty and loses its stick. But washing it in the kitchen sink with dish soap and dish brush restores it pretty much like new. She keeps a second square with her in her backpack for use at her after-school program.

Losing Glasses
Losing glasses is a constant risk with a 7 year old who has three pairs to keep track of. What’s more, these things are not easy to replace. A big shout out then for 1) Liberty Sport who thoughtfully put a name/address label inside their frame cases, and 2) the kind souls who have recently been finding my daughter’s glasses, opening the cases, and calling me. We left a pair at the bank, and got them back last month. Then on our summer vacation my daughter left a pair behind in LAX baggage claim. I was sure we would never see them again. But 12 hours later I got a call, and was soon driving to East LA to pick them up from the home of someone who had rescued them. Yay!
Eclipse
We watched the eclipse on August 21, 2017 from southern California. Eclipse glasses were a total bust for my daughter. We were on the path of partial eclipse, not total eclipse, so there was never a time it got dark. The eclipse glasses let my daughter look at the sun but it just looked like a circle to her, she couldn’t see the crescent shape. The pinhole camera we made was also a bust for the same reason. However the pinhole projector worked (phew, glad for 2 strikes not 3). We got a clear crescent image projected on white card on the ground about the size of a quarter, which my daughter could see by getting down close to it. The other good thing was the dappled shadows from the trees were all in crescent shapes a few inches across and those were fun to spot.
Monocular
We love visiting the aquarium with our kids. Everything is kept dark inside, and you can get right up and put your nose against the glass to see fish, sharks, and other creatures. My daughter can really see everything. Visiting the zoo is a little tougher. If the animals are at the back of their enclosure, even big ones like elephants can be hard for my daughter to see. Zoom on an ipad doesn’t work outside in the bright sun where no one can see the screen. So an obvious solution seems like binoculars or a monocular. I’ve heard on the Yahoo group that binoculars are better than monoculars, but we’ve had so much trouble getting either to work that I decided to start with monoculars because they are what we could get help with from low-vision experts locally.
We’ve tried a variety of monoculars and binoculars, and my daughter could see with them inside the house no problem. But as soon as we stepped outside, we just couldn’t get them to work for her. Without her glasses it would be too bright. But with them she couldn’t see either. The problem seems to be twofold: first even with the eye cups rolled down for use with glasses, my daughter’s glasses keep the monocular away from her eye, reducing her field of view. That makes finding what she is trying to look at that much harder, which is difficult enough for a small child. Second, a monocular already cuts out some light. So with her regular outside glasses and the monocular both blocking light, it was actually too dark for her to see. But looking through the monocular with her inside glasses was still too light.
After much trial and error, we’ve finally hit upon a solution that works. Hooray! Thanks to Bob McGillivray, Director of Low Vision Services at the Carroll Center for the Blind and Terry at their low vision store for helping us get there!
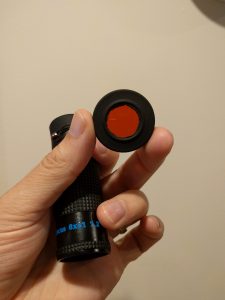
We got two 8×20 monoculars from the Carroll Center store, pretty much the same as this one that you can get at MaxiAids. (Actually one is 8×20 and the other 8×21 as we bought them at different times and the models changed. 8x is the magnification, 20mm is the objective lens diameter. They have a 7.2° field of view.)
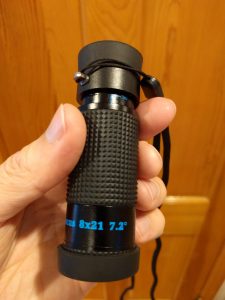
Reizen Extra Short Focus Monocular 8×21, 7.2 degree field of view
Next, and this is the important part: We found that NoIR lens #570 39% Dark Red/Orange is just right for use with this monocular. We went outside on a sunny day at the Carroll Center with the monocular and a full set of NoIR lenses. This is the NoIR filter that when held over the end of the monocular let my daughter see. It makes sense too–it is the one that my daughter found to be too dark inside but too light outside when used on its own. Apparently that makes it a perfect complement to this particular monocular.
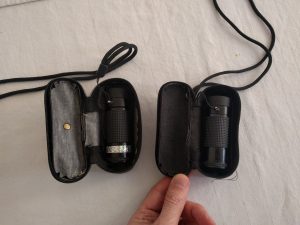
So Terry cut down the lens (by hand as the lens cutting machines do not go this small normally!) to the diameter of the monocular. Then I used superglue (the gel kind, not the runny kind) to glue the NoIR lens over the end of one of the monoculars (the end you put your eye to seemed best). Now my daughter has two monoculars, one for inside use, and one for outside use with the NoIR filter on the end. We use glitter tape to help her tell them apart. You can see them in their cases and out, the glitter tape marks the one for outside use that has the NoIR filter on it–you can see it in the picture on the left-hand side.
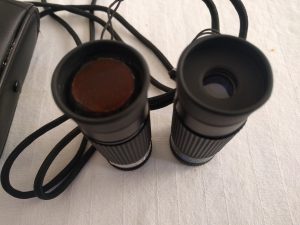
Left-hand side: Outside monocular with NoIR 570 filter. Right-hand side: Inside monocular.
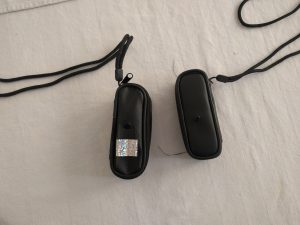
In their cases, glitter tape marks the outside monocular.
Now my daughter uses it every week during her O&M lessons. Even better would be a cap that could come on and off so that she only needed to carry one monocular with her. In fact that is what Bob McGillivary and Terry made for us first, you can see it here where the NoIR filter is inset into the monocular’s rubber lens cap:Unfortunately, as I didn’t devise any kind of lanyard for the cap my daughter lost it after a few months. Hard to blame her for that. So now that its glued on permanently, she can’t lose it without losing the whole monocular.
The NoIR lens cap Bob McGillivray and Terry made for us originally that was unfortunately lost. It needed a lanyard like my car’s gas cap!
Tinting frustration
Is it really so hard to tint lenses? We’ve been trying to get new outdoor glasses made for my daughter since January. Time and again they come back from the lab too light, and most recently the wrong color. Is it really more complicated than leaving the lens in a bath of the correct dye until their measurement device shows it to be the tint strength we requested? This same lab has done it before so I don’t know why they can’t seem to do it again. It has been so frustrating that I have looked into starting my own optical tinting lab in the basement. It looks like it would cost $1,000 to get started, so not really practical. But much like other impractical things, like getting a second shower in our house, or a new kitchen, its nice to day dream about. What I’d get would be a BPI Digital Mini Tank 4 ($566.45) to dye the lenses (when you buy one they include a starter kits of all the chemicals you need), the dye we use for my daughter’s lenses (BPI FL-41, $30.70), and a BPI Mini Meter photometer ($299.95) to measure the lens transmittance (what % light they let through).
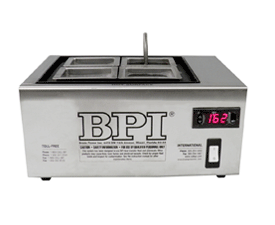
BPI Digital Mini Tank 4 ($566.45)
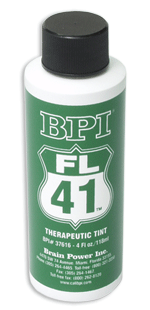
($30.70)
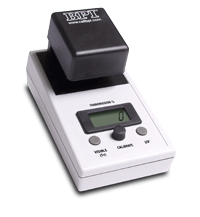
BPI Mini Meter ($299.95)