
We’ve found flash cards to be a big help in learning sight words (both for print and braille) as well as for contractions. I braille a word, contraction, or symbol on the front, and write what it stands for on the back in large print, with some parental notes in small print. This is what a finished pack looks like:

The image shows a pack of flash cards on a 1.5 inch binder ring open to the middle of the pack. The flash cards are approximately 2.5 inches wide by 2 inches tall. The flash card on the left is front-side up, and has a “k” in braille on it. The flash card on the ride is back-side up and shows text on four lines: Line 1) “z”; Line 2) “as”; Line 3) “alphabetic wordsigns”; Line 4) “Contractions 1”. Lines 1-2 are in Calibiri size 28 font. Lines 3-4 are in Calibri size 11 font.
My daughter goes through a pack, feeling the braille on the front, saying what it is, and turning it over to check or have a parent check the answer. Any she gets wrong she puts back into the pile she is working on, so she revisits it again later while finishing the pack. For a while we did flash cards every day.
Try making your own! Here is some material to get you started. First I give you what you need to replicate my flashcards, then I tell you how to make your own from scratch if you want different ones. Also see my advice on useful tools and materials (which for flash cards include PC & printer, braille paper, Perkin’s brailler, braille eraser, paper cutter, heavy duty hole punch, and binder rings.)
Making your own copy of the flash cards I use:
If you’d like to make your own copies of any of the flash cards I have made, I’m posting all the files you’ll need below and will tell you how to do it.
Step 1: Download my universal Flash Card Template.
Step 2: Then choose which set of flash cards you’d like to make and download the PDF file. I have on offer:
- UEB Contractions. Note that, in my short hand, “b-con; m-cc; e-:” means that a shifted-down c (2-5-dots) means “con” at the beginning of a word, “cc” in the middle of a word, or “:” at the end of a word.
- UEB Shortform
- UEB Typeform (bold, italics, underline)
- Numbers (UEB 1–20, Text 1–20, +, -, <, >, =)
- 2nd Grade Trick Words
- 1st Grade Sight Words
- Selected Shortform that appear in a Pony Party easy reader.
Step 3: On heavy weight 8.5 x 11 inch braille paper, print out the universal Flash Card Template on the front, and then print out your chosen set of flash cards on the back side. Print a second set of your chosen flash cards out on regular printer paper and staple. Don’t forget to select single sided printing.
| Front | Back |
 Loading...
|
Loading...
|
The Flash Card Template that you print on the front side prints vertical and horizontal lines that create a grid on the page that correspond to the borders of your flash cards. (In Step 5 you will cut along the lines). The grid makes 5 rows and 3 columns for 15 total flash cards that are approximately 2.5 inches wide by 2 inches tall.
The Flash Card Pack you print on the back side prints text centered inside each of the 15 flash cards. The text serves as the answer key to the braille which will be brailled on the front in Step 4, as well as miscellaneous notes, such as a description of the type of contraction (e.g. “alphabetic wordsigns”).
Step 4: Load the braille paper into your Perkin’s brailler with the blank front side up. Braille the appropriate word or contraction inside each box following your print-out on regular paper.
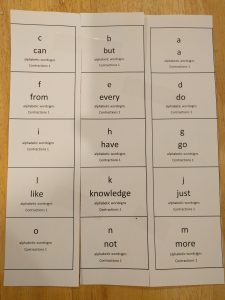
Warning: Step 4 is harder than it sounds. Since you have the sheet in the brailler loaded print-side down, the order of the flash cards is reversed to that on the regular-paper printout you are copying. Thus, if (as in the example above) the first row of flash cards appear (1) “a”, (2) “b”, (3) “c”, on your printed copy, you must braille them in reverse order (1) “c”, (2) “b”, (3) “a”. In other words, as you braille left to right, follow the print-out right to left. I found this way harder than it sounds. Impossible to get right in fact. So what I did in the end was cut each sheet of my regular-paper print-out into three columns and tape them back together in the reverse order. For example, page 1 of my contractions flash cards looked like this after this treatment. This is a lot of cutting (quicker with the paper cutter) and taping, but I found time saving in the end.
Step 5: Cut out the flash cards with a paper cutter. Hole punch your cards with a heavy duty hole-punch. Pick a corner, such as top-right, and be consistent. Your child will know which way up the card goes by orienting the hole-punch the right way. Bind with a binder ring.
Making your own flashcards from scratch following my approach
To make your own flash cards from scratch, you can follow the recipe as above, after first making your own PDF file of flash cards to substitute into step 2. You could just enter all the text manually to this word template. However, I find the easiest way to do this is making a list in Excel and putting it into flash cards using the labels option of the Mail Merge Wizard in MS Word. Basically you pretend that your flash cards are mailing labels. Here’s how to do it:
Step 1: Make a list of the words you want on your flashcards in Excel. You can download my spreadsheet as a model, and edit it as you like. I generally have at least two columns. The first for the symbol, e.g. “5-dot-w”, and the second for what it means, e.g, “work”. But you can see I often add additional columns, for example describing what type of contraction it is.
Step 2: Follow the mail merge wizard in MS Word to create flash cards. If you have Word 2016, you should be able to follow the same steps that I took:
- Open a blank document in MS Word 2016 and choose the “Mailings” tab from the ribbon.
- Select “Start Mail Merge” which opens a menu, and choose the last item, “Step-by-Step Mail Merge Wizard…”
- In the top right corner under “Mail Merge” it says “Select document type” and “Letters” is chosen by default. Choose instead “Labels”. Then at the bottom left, under “Step 1 of 6” select “Next: Starting document”
- You are now on “Step 2 of 6”. In the top right corner under “Select starting document”, the default selection is “Use the current document”. Leave the default and choose “Label options…” A “label options” dialog box opens. Select the button “New Label…”. In the resulting “Label Details” dialog box that appears enter a Label name such as “Braille Flash Cards” and choose the following options: Top Margin 0.3″; Side Margin 0″; Vertical pitch 2.05″; Label height 2.05″; Horizontal pitch 2.75″; Label width = 2.75; Number across 3; Number down 5; Page size Letter. Hit OK, and hit OK again. Both dialog boxes should now be closed. Proceed by selecting “Next: Select recipients”
- You are now on “Step 3 of 6”. “Use an existing list” should be selected. Select “Browse…” under “Use an existing list”. Select the excel spreadsheet with your flash card words and choose open. If you are using mine, that would be Flash Cards 2.xlsx. A “Select Table” dialog box opens. Choose the worksheet within your spreadsheet you want to use for your flash cards, for example in my spreadsheet to make my contraction flash card pack I select the “Contractions$” option listed, and leave the “First row of data contains column headers” box ticked. Hit “OK”. A second “Mail Merge Recipients” dialog box opens. Hit “OK”. Now all the dialog boxes have closed, choose “Next: Arrange your labels”
- You are now on “Step 4 of 6”. In the top right corner choose the link “More items…” Double click all the columns that you want to appear on the back of your flashcards. For my contractions pack this includes “character” and “word”, as well as “type” or “group” if you like. Choose “close” when you’ve selected all the ones you want.
- You are still on “Step 4 of 6”. Now the columns should appear on the top-leftt flash card as “<<Character>><<Word>>” etc. Format them how you like. For instance, I separate them by hard returns to be on different lines, center them, and increase the font size. When you have them how you like, hit the button “Update all labels”. Now proceed by choosing “Next: Preview your labels”.
- You are now on “Step 5 of 6”. If you don’t like how they look, go back to Step 4 and adjust. Otherwise choose “Next: Complete the merge”.
- You are now on “Step 6 of 6”. Choose “Print” and hit “OK” on the first dialog box that appears. You should now see you normal print dialog box. Under Printer name, choose “Microsoft Print to PDF” and choose OK. Now a third dialog box appears to let you choose where to save your new flash cards as a PDF file. Choose a location and filename, hit OK and you are done. You now have a PDF file you can use in step 2 of the directions at the top of this page.