Starters
What’s the point? First off, brailling your own books may not save you any money and will take you a lot of time. So, if you can get braille books another way, try that first. I sometimes found, however, that I couldn’t get braille books at the right level for my daughter, particularly when she was just starting to learn to read in kindergarten and first grade. It was easy to get picture books and chapter books but hard to get easy readers and pre-easy readers. That’s why I started brailling books for her.
Learning braille: Before you can start brailling your own books you need to know some braille. For that, check out my thoughts on learning braille as a sighted parent.
Overview
I have taken 2 general approaches to creating kids braille books with original pictures.
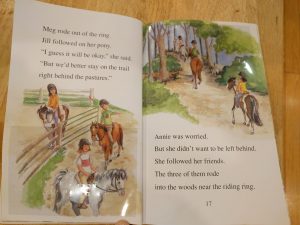
- Easy Readers + Braille Label Paper: The most straightforward approach is buy easy readers, braille the text of each page on braille label paper, cut out the braille, and stick it into the book. Follow the link for a (little) more detail. Example finished product (The Trail Ride by Catherine Hapka):
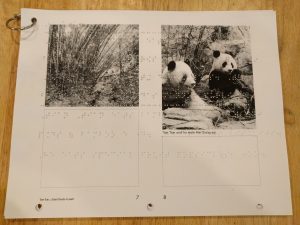
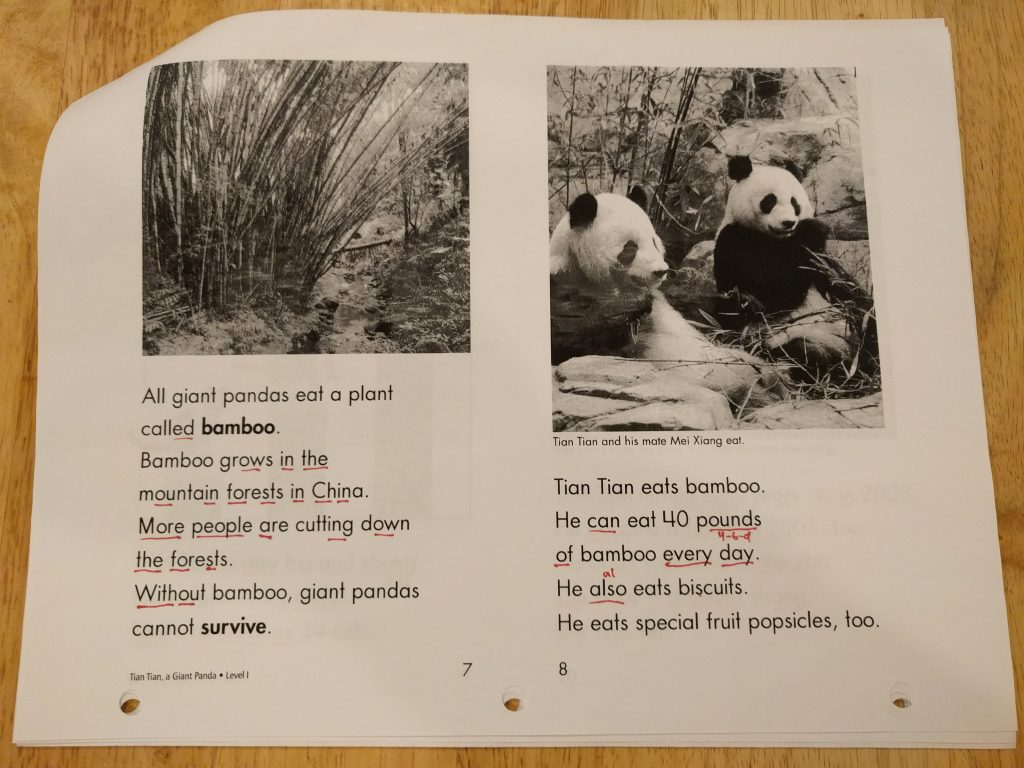
- Braille Paper + Laser Printer: While less straightforward, I find it far quicker, easier, and cheaper to get digital PDF copies of kids books, print them out onto braille paper, and then braille the text on top, right over the print text and pictures. Follow the link for a (lot) more detail on all the steps, starting with how to get digital copies of print books. Example finished products (Tian Tian, a Giant Panda by Melanie Shepherd and The Princess in Black Takes a Vacation by Shannon Hale and Dean Hale):

Whichever approach strikes your fancy, you’ll need some supplies. See my suggestions for Tools and Materials. Below I share some of my experience that applies for either approach
Comments Applicable to Either Approach
- Partial UEB: While our daughter was midway through learning UEB contractions, I brailled her books in partial UEB–just including contractions she knew plus a couple more to learn. New ones, or ones she didn’t have down firmly yet, I often brailled on the title page (the contraction and then the uncontracted form), so she could feel them before starting the book. When I began before Kindergarten very little was contracted, and by the start of second grade it was all contacted. This is a nice touch you can’t get if you don’t make your own books.
- Print Copy & Red Ink: Whenever I had a digital copy or photocopy of the print book, I always print out a second copy of the book on regular paper. This is what I follow when I am brailling the braille copy. It is also what I follow along with when my daughter is reading. When I was a beginner at UEB, my first step would be to through the print copy first and mark all the contractions, either by underlining or putting parenthesis around them in red ink. If I was unsure of any and needed to look them up, I took care of this during the red-ink step (putting notes such as “5-dot-w” next to “work”). This meant that I could braille the whole book in step 2 without stopping to look things up or just missing contractions altogether. Now I’m more fluent in UEB, I skip this red-ink step as unnecessary. For example, here is a page from my red-inked copy for Tian Tian, a Giant Panda by Melanie Shepherd:
- Mistakes: While a braille eraser is handy for fixing mistakes you notice, making mistakes you don’t catch is unavoidable. This is no problem though. I pay my daughter a quarter for each mistake of mine she catches. Then instead of being frustrated with me for telling her she is sounding out the word incorrectly, when the error is actually mine, she is triumphant for catching me out and earning her quarter. I mark the mistake in red ink on my print copy so next time we waste less time with me thinking she’s reading it wrong, and so I don’t have to pay twice for the same mistake. Here’s an example
Other possible approaches
Lastly, its worth noting that there might be easier ways to make your own books. For instance, if you have access to a braille embosser through your child’s TVI the following might work: First obtain a digital braille copy of a book (you can get them via bookshare) and a copy of the book that has pictures (most don’t on bookshare but some do). Use the embosser to print out the braille text without pictures, 3-hole punch it and put it in a 3-ring binder. Then photo-copy pictures from a print hardcopy, cut them out, and paste them on to pages that you insert into the binder at the right spots. I haven’t tried this, but it seems like a good idea.